Ruby on rails tutorial - Michael Hartl - Chap 1-4
These are my notes for the book: Ruby on rails tutorial - Michael Hartl.
This is a big book but is quite famous on the web to teach you the complete package not the chit-chats. So lets get started:
Chapter 1 - From zero to deploy
Introduction
Rails is:
- open source
- a domain-specific language for writing web applications
- adapts rapidly to new developments in web technology and framework design.
Installation
gem install rails -v 4.2.2
### The first application
$ cd ~/workspace
$ rails _4.2.2_ new hello_app
The explicit include of the Rails version number (_4.2.2_) ensures that the same version of Rails is used. Running rails new automatically runs the bundle install command after the file creation is done.
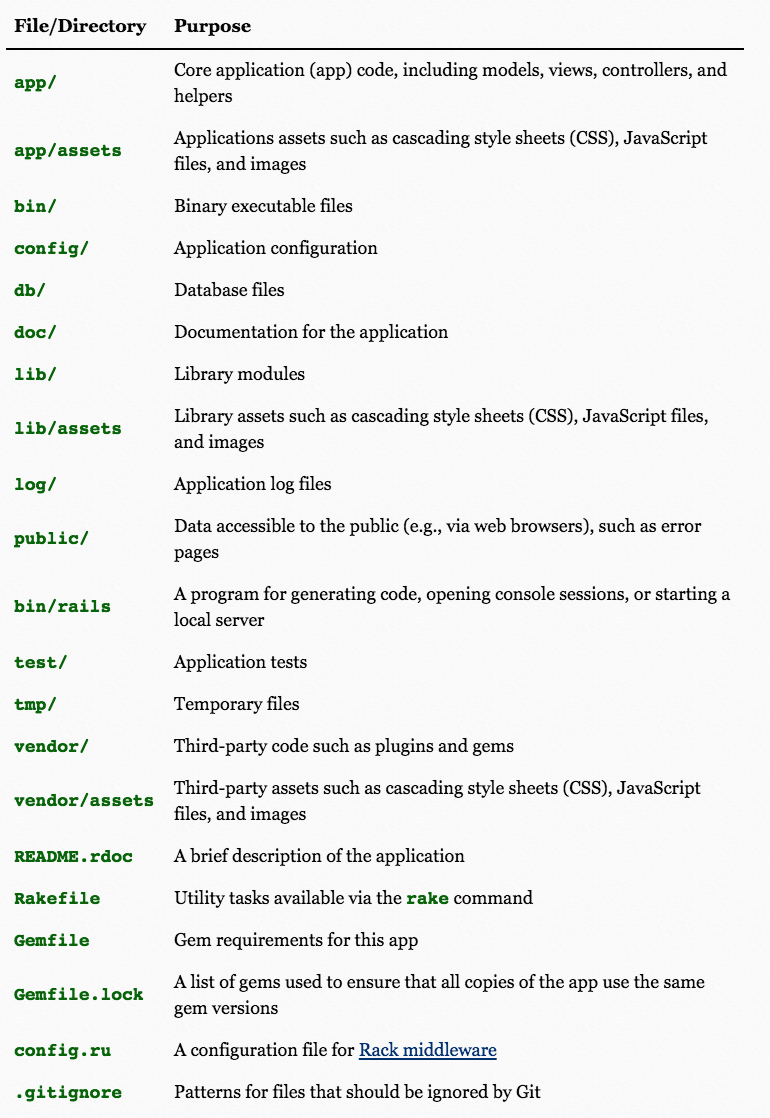
Directory Structure
Gemfile
Versioning: It helps to specify the version of dependencies:
- Unless you specify a version number to the gem command, Bundler will automatically install the latest requested version of the gem:
gem 'sqlite3' gem 'uglifier', '>= 1.3.0': This installs the latest version of theuglifiergem as long as it’s greater than or equal to version1.3.0gem 'coffee-rails', '~> 4.0.0': This installs thegem coffee-railsas long as it’s newer than version4.0.0and not newer than4.1.
Converting the default Gemfile to use exact gem versions:
source 'https://rubygems.org'

gem 'rails',                '4.2.2'
gem 'sass-rails',           '5.0.2'
gem 'uglifier',             '2.5.3'
gem 'coffee-rails',         '4.1.0'
gem 'jquery-rails',         '4.0.3'
gem 'turbolinks',           '2.3.0'
gem 'jbuilder',             '2.2.3'
gem 'sdoc',                 '0.4.0', group: :doc

group :development, :test do
  gem 'sqlite3',     '1.3.9'
  gem 'byebug',      '3.4.0'
  gem 'web-console', '2.0.0.beta3'
  gem 'spring',      '1.1.3'
end
Note that we’ve also taken this opportunity to arrange for the sqlite3 gem to be included only in a development or test environment, which prevents potential conflicts with the database used by Heroku.
Install again: $ bundle install.
Deployment
Thanks to running
rails newandbundle install, we already have an application we can run.
Rails comes with a pre built server which can be used for testing and debugging.
$ rails server
Model-View-Controller (MVC)
Rails follows MVC pattern and you will see three different directories inside app/ for each MVC.
Hello, world!
Change app/controllers/application_controller.rb to:
class ApplicationController < ActionController::Base
  # Prevent CSRF attacks by raising an exception.
  # For APIs, you may want to use :null_session instead.
  protect_from_forgery with: :exception

  def hello
    render text: "hello, world!"
  end
end
and config/routes.rb to:
Rails.application.routes.draw do
  .
  .
  .
  # You can have the root of your site routed with "root"
  root 'application#hello'
  .
  .
  .
end
Rails router determines where to send requests that come in from the browser.
Version Control
git mv README.rdoc README.md
Deploying
Heroku is defacto for ruby deployment.
Heroku uses the PostgreSQL database, which means that we need to add the pg gem in the production environment to allow Rails to talk to Postgres. sqlite3 is not supported by heroku. Note also the addition of the rails_12factor gem, which is used by Heroku to serve static assets such as images and stylesheets.
group :production do
  gem 'pg',             '0.17.1'
  gem 'rails_12factor', '0.0.2'
end
To prepare the system for deployment to production, we run bundle install with a special flag to prevent the local installation of any production gems:
$ bundle install --without production
Because the only gems added are restricted to a production environment, right now this command doesn’t actually install any additional local gems, but it’s needed to update Gemfile.lock with the pg and rails_12factor gems.
Heroku setup (one time)
- Sign up
- Install heroku :
brew install heroku heroku loginheroku keys:add
Heroku add deployment
$ heroku create
Creating damp-fortress-5769... done, stack is cedar
http://damp-fortress-5769.herokuapp.com/ | git@heroku.com:damp-fortress-5769.git
Git remote heroku added
The heroku command creates a new subdomain just for our application, available for immediate viewing. To deploy the application, the first step is to use Git to push the master branch up to Heroku:
$ git push heroku master
That’s it the application is deployed.
$ heroku rename rails-tutorial-hello
Chapter 2 - A toy app
This will explore the power of rails scaffolding. The toy app will consist of users and their associated microposts (thus constituting a minimalist Twitter-style app).
Planning the application
rails _4.2.2_ new toy_appcd toy_app/-
Replace
Gemfile```ruby source ‘https://rubygems.org’
gem ‘rails’, ‘4.2.2’ gem ‘sass-rails’, ‘5.0.2’ gem ‘uglifier’, ‘2.5.3’ gem ‘coffee-rails’, ‘4.1.0’ gem ‘jquery-rails’, ‘4.0.3’ gem ‘turbolinks’, ‘2.3.0’ gem ‘jbuilder’, ‘2.2.3’ gem ‘sdoc’, ‘0.4.0’, group: :doc
group :development, :test do gem ‘sqlite3’, ‘1.3.9’ gem ‘byebug’, ‘3.4.0’ gem ‘web-console’, ‘2.0.0.beta3’ gem ‘spring’, ‘1.1.3’ end
group :production do gem ‘pg’, ‘0.17.1’ gem ‘rails_12factor’, ‘0.0.2’ end ```
bundle install --without production- git setup
heroku creategit push heroku master
Models
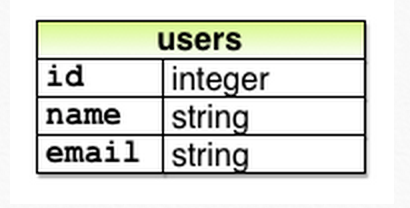
User
$ rails generate scaffold User name:string email:string
      invoke  active_record
      create    db/migrate/20140821011110_create_users.rb
      create    app/models/user.rb
      invoke    test_unit
      create      test/models/user_test.rb
      create      test/fixtures/users.yml
      invoke  resource_route
       route    resources :users
      invoke  scaffold_controller
      create    app/controllers/users_controller.rb
      invoke    erb
      create      app/views/users
      create      app/views/users/index.html.erb
      create      app/views/users/edit.html.erb
      create      app/views/users/show.html.erb
      create      app/views/users/new.html.erb
      create      app/views/users/_form.html.erb
      invoke    test_unit
      create      test/controllers/users_controller_test.rb
      invoke    helper
      create      app/helpers/users_helper.rb
      invoke      test_unit
      create        test/helpers/users_helper_test.rb
      invoke    jbuilder
      create      app/views/users/index.json.jbuilder
      create      app/views/users/show.json.jbuilder
      invoke  assets
      invoke    coffee
      create      app/assets/javascripts/users.js.coffee
      invoke    scss
      create      app/assets/stylesheets/users.css.scss
      invoke  scss
      create    app/assets/stylesheets/scaffolds.css.scss
Note that there is no need to include a parameter for id; it is created automatically by Rails for use as the primary key in the database.
$ bundle exec rake db:migrate
==  CreateUsers: migrating ====================================================
-- create_table(:users)
   -> 0.0017s
==  CreateUsers: migrated (0.0018s) ===========================================
This simply updates the database with our new users data model. Rake is make for ruby. To see all the database tasks use $ bundle exec rake -T db. To see all the tasks rake can do use $ bundle exec rake -T.
To ensure that the command uses the version of
Rakecorresponding to ourGemfile, we need to run rake usingbundle exec.
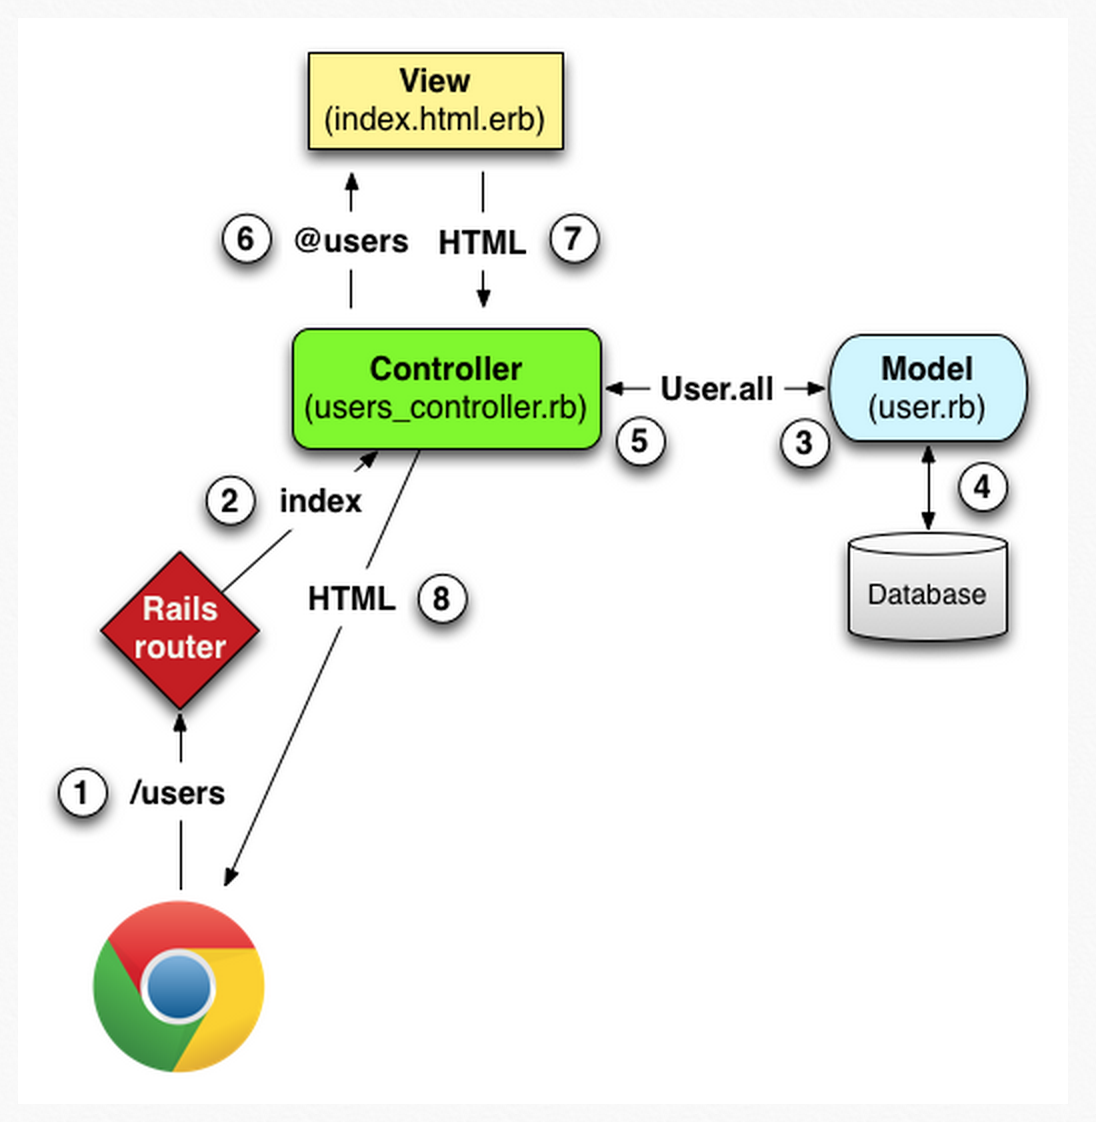
User tour

User MVC in action
User routes
# config/routes.rb
Rails.application.routes.draw do
  resources :users
  .
  .
  .
end
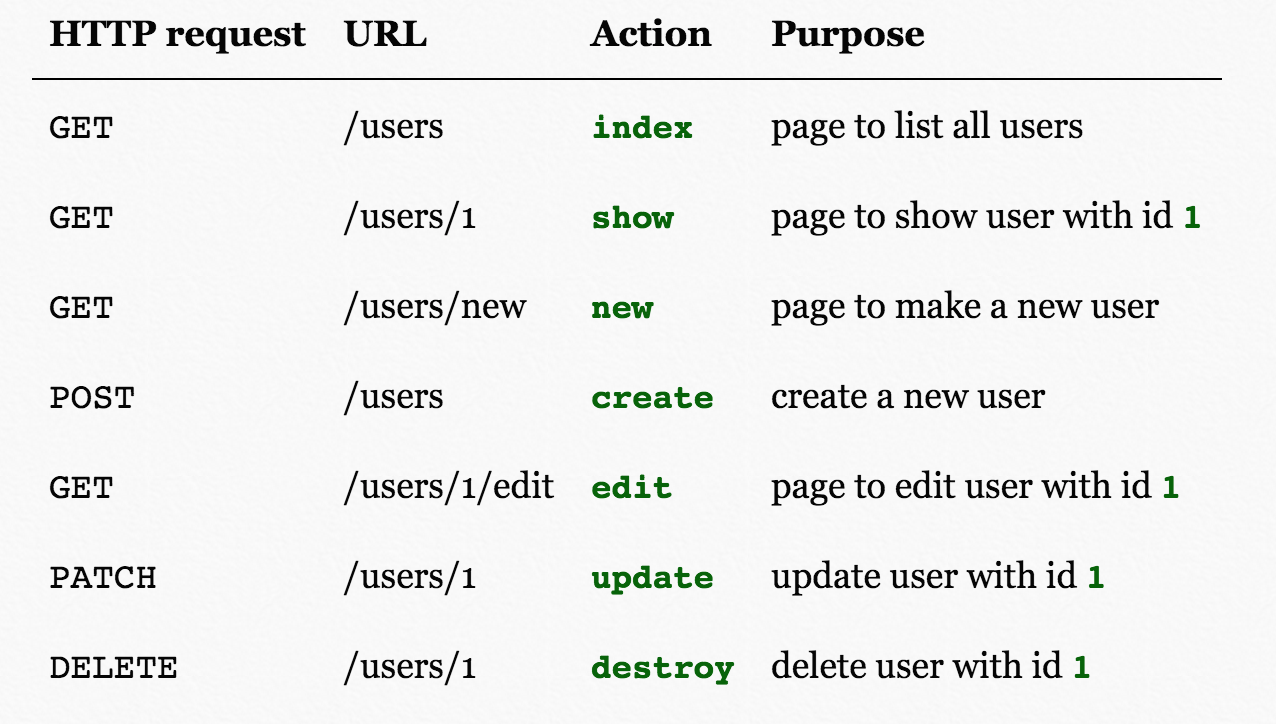
This maps all the urls specified in the table above. The :user is a symbol in ruby. To make the root page of the app (/) to print all the users do the following:
#config/routes.rb
Rails.application.routes.draw do
  resources :users
  root 'users#index'
  .
  .
  .
end
User controller
# app/controllers/users_controller.rb
class UsersController < ApplicationController
  .
  .
  def index
    .
    .
  end

  def show
    .
    .
  end

  def new
    .
    .
  end

  def edit
    .
    .
  end

  def create
    .
    .
  end

  def update
    .
    .
  end

  def destroy
    .
    .
  end
end
User Model
# app/models/user.rb
class User < ActiveRecord::Base
end
Then this model is used in controller to talk to db:
#app/controllers/users_controller.rb
class UsersController < ApplicationController
  .
  .
  .
  def index
    @users = User.all
  end
  .
  .
  .
end
Once the @users variable is defined, the controller calls the view
User View
Variables that start with the @ sign, called instance variables, are automatically available in the views; in this case, the index.html.erb:
<h1>Listing users</h1>

<table>
  <thead>
    <tr>
      <th>Name</th>
      <th>Email</th>
      <th colspan="3"></th>
    </tr>
  </thead>

<% @users.each do |user| %>
  <tr>
    <td><%= user.name %></td>
    <td><%= user.email %></td>
    <td><%= link_to 'Show', user %></td>
    <td><%= link_to 'Edit', edit_user_path(user) %></td>
    <td><%= link_to 'Destroy', user, method: :delete,
                                     data: { confirm: 'Are you sure?' } %></td>
  </tr>
<% end %>
</table>

<br>

<%= link_to 'New User', new_user_path %>
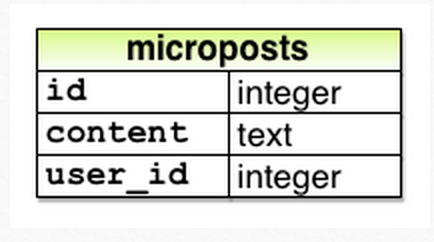
Microposts
Do the same thing with microposts:
$ rails generate scaffold Micropost content:text user_id:integer$ bundle exec rake db:migrate- Routes:
resources :microposts - Check the controller, model and view
Adding validation
# app/models/micropost.rb
class Micropost < ActiveRecord::Base
  validates :content, length: { maximum: 140 }, presence: true
end
User-Micropost relationship
One of the most powerful features of Rails is the ability to form associations between different data models.
# app/models/user.rb
class User < ActiveRecord::Base
  has_many :microposts
end
# app/models/micropost.rb
class Micropost < ActiveRecord::Base
  belongs_to :user
  validates :content, length: { maximum: 140 }
end
Rails console
It is a useful tool for interacting with Rails applications.
$ rails console
>> first_user = User.first
=> #<User id: 1, name: "Michael Hartl", email: "michael@example.org",
created_at: "2014-07-21 02:01:31", updated_at: "2014-07-21 02:01:31">
>>
>> first_user.microposts
=> [#<Micropost id: 1, content: "First micropost!", user_id: 1, created_at:
"2014-07-21 02:37:37", updated_at: "2014-07-21 02:37:37">, #<Micropost id: 2,
content: "Second micropost", user_id: 1, created_at: "2014-07-21 02:38:54",
updated_at: "2014-07-21 02:38:54">]
>>
>> micropost = first_user.microposts.first    # Micropost.first would also work.
=> #<Micropost id: 1, content: "First micropost!", user_id: 1, created_at:
"2014-07-21 02:37:37", updated_at: "2014-07-21 02:37:37">
>>
>> micropost.user
=> #<User id: 1, name: "Michael Hartl", email: "michael@example.org",
created_at: "2014-07-21 02:01:31", updated_at: "2014-07-21 02:01:31">
>>
>> exit
Inheritance
User, Micropost < ActiveRecord::Base

UsersController, MicropostsController < ApplicationController < ActionController::Base
ActionController::Base includes the ability to manipulate model objects, filter inbound HTTP requests, and render views as HTML.
Deploying
git push herokuheroku run rake db:migrate
Chapter 3 - Mostly static pages
Setup
rails _4.2.2_ new sample_app-
Replace
Gemfile```ruby source ‘https://rubygems.org’
gem ‘rails’, ‘4.2.2’ gem ‘sass-rails’, ‘5.0.2’ gem ‘uglifier’, ‘2.5.3’ gem ‘coffee-rails’, ‘4.1.0’ gem ‘jquery-rails’, ‘4.0.3’ gem ‘turbolinks’, ‘2.3.0’ gem ‘jbuilder’, ‘2.2.3’ gem ‘sdoc’, ‘0.4.0’, group: :doc
group :development, :test do gem ‘sqlite3’, ‘1.3.9’ gem ‘byebug’, ‘3.4.0’ gem ‘web-console’, ‘2.0.0.beta3’ gem ‘spring’, ‘1.1.3’ end
group :test do gem ‘minitest-reporters’, ‘1.0.5’ gem ‘mini_backtrace’, ‘0.1.3’ gem ‘guard-minitest’, ‘2.3.1’ end
group :production do gem ‘pg’, ‘0.17.1’ gem ‘rails_12factor’, ‘0.0.2’ end ```
bundle install --without production- Initialize git
git mv README.rdoc README.mdheroku creategit push heroku master- In case of any issue in heroku use
heroku logs
Static pages
Static website is going to only deal with app/controllers and app/views.
Checkout new branch: git checkout master; git checkout -b static-pages
Generated static pages
Generate a controller named StaticPages with home and help as actions: rails g controller StaticPages home help. This will generate a controller named static_pages_controller.rb which will have a class named StaticPages. Commit and push new branch.
Undoing things:
$ rails generate controller StaticPages home help
$ rails destroy  controller StaticPages home help

$ rails generate model User name:string email:string
$ rails destroy model User

$ bundle exec rake db:migrate
# We can undo a single migration step using
$ bundle exec rake db:rollback
# To go all the way back to the beginning, we can use
$ bundle exec rake db:migrate VERSION=0

# As you might guess, substituting any other number for 0 migrates to that version number, where the version numbers come from listing the migrations sequentially.
The Static Pages controller generation automatically updates the routes file (config/routes.rb):
# config/routes.rb
Rails.application.routes.draw do
  get 'static_pages/home'
  get 'static_pages/help'
  .
  .
  .
end
This maps requests for the URL /static_pages/home to the home action in the Static Pages controller. Moreover, by using get we arrange for the route to respond to a GET request.
Lets see the controller:
# app/controllers/static_pages_controller.rb
class StaticPagesController < ApplicationController

  def home
  end

  def help
  end
end
Things to observe:
- Unlike the demo Users and Microposts controllers from Chapter 2, the Static Pages controller does not use the standard REST actions. This is normal for a collection of static pages: the REST architecture isn’t the best solution to every problem.
- In plain Ruby, these methods would simply do nothing. In Rails, the situation is different—
StaticPagesControlleris a Ruby class, but because it inherits fromApplicationControllerthe behavior of its methods is specific to Rails: when visiting the URL/static_pages/home, Rails looks in the Static Pages controller and executes the code in the home action, and then renders the view corresponding to the action.
Customize static pages
home.html.erb:
<h1>Sample App</h1>
<p>
  This is the home page for the
  <a href="http://www.railstutorial.org/">Ruby on Rails Tutorial</a>
  sample application.
</p>
help.html.erb:
<h1>Help</h1>
<p>
  Get help on the Ruby on Rails Tutorial at the
  <a href="http://www.railstutorial.org/#help">Rails Tutorial help section</a>.
  To get help on this sample app, see the
  <a href="http://www.railstutorial.org/book"><em>Ruby on Rails Tutorial</em>
  book</a>.
</p>
Getting started with testing
Writing automated tests has three main benefits:
- Tests protect against regressions, where a functioning feature stops working for some reason.
- Tests allow code to be refactored (i.e., changing its form without changing its function) with greater confidence.
- Tests act as a client for the application code, thereby helping determine its design and its interface with other parts of the system.
It’s helpful to have a set of guidelines on when we should test first (or test at all). Here are some suggestions :
- When a test is especially short or simple compared to the application code it tests, lean toward writing the test first.
- When the desired behavior isn’t yet crystal clear, lean toward writing the application code first, then write a test to codify the result.
- Because security is a top priority, err on the side of writing tests of the security model first.
- Whenever a bug is found, write a test to reproduce it and protect against regressions, then write the application code to fix it.
- Lean against writing tests for code (such as detailed HTML structure) likely to change in the future.
- Write tests before refactoring code, focusing on testing error-prone code that’s especially likely to break.
Our main testing tools will be controller tests, model tests, and integration tests. Integration tests are especially powerful, as they allow us to simulate the actions of a user interacting with our application using a web browser. Integration tests will eventually be our primary testing technique, but controller tests give us an easier place to start.
First Test
rails generate controller automatically generated a test file to get us started:
# test/controllers/static_pages_controller_test.rb
require 'test_helper'

class StaticPagesControllerTest < ActionController::TestCase

  test "should get home" do
    get :home
    assert_response :success
  end

  test "should get help" do
    get :help
    assert_response :success
  end
end
Addind test case
# test/controllers/static_pages_controller_test.rb
require 'test_helper'

class StaticPagesControllerTest < ActionController::TestCase
  .
  .
  .

  test "should get about" do
    get :about
    assert_response :success
  end
end
$ bundle exec rake test
.E.

Finished in 0.339603s, 8.8338 runs/s, 5.8892 assertions/s.

  1) Error:
StaticPagesControllerTest#test_should_get_about:
ActionController::UrlGenerationError: No route matches {:action=>"about", :controller=>"static_pages"}
    test/controllers/static_pages_controller_test.rb:15:in `block in <class:StaticPagesControllerTest>'

3 runs, 2 assertions, 0 failures, 1 errors, 0 skips
As specified in the error lets add the route: get 'static_pages/about' and run the test again.
$ bundle exec rake test
Finished in 0.351095s, 8.5447 runs/s, 5.6965 assertions/s.

  1) Error:
StaticPagesControllerTest#test_should_get_about:
AbstractController::ActionNotFound: The action 'about' could not be found for StaticPagesController
    test/controllers/static_pages_controller_test.rb:15:in `block in <class:StaticPagesControllerTest>'

3 runs, 2 assertions, 0 failures, 1 errors, 0 skips
The error message now indicates a missing about action in the Static Pages controller. Lest add it:
# app/controllers/static_pages_controller.rb
class StaticPagesController < ApplicationController
  .
  .

  def about
  end
end
Now the error changed to missing views:
$ bundle exec rake test
ActionView::MissingTemplate: Missing template static_pages/about
Lets create the view: touch app/views/static_pages/about.html.erb and add following html to it:
<h1>About</h1>
<p>
  The <a href="http://www.railstutorial.org/"><em>Ruby on Rails
  Tutorial</em></a> is a
  <a href="http://www.railstutorial.org/book">book</a> and
  <a href="http://screencasts.railstutorial.org/">screencast series</a>
  to teach web development with
  <a href="http://rubyonrails.org/">Ruby on Rails</a>.
  This is the sample application for the tutorial.
</p>
Now the test passes:
$ bundle exec rake test
3 tests, 3 assertions, 0 failures, 0 errors, 0 skips
Adding title - getting slightly dynamic
The rails new command creates a layout file by default, but it’s instructive to ignore it initially, which we can do by changing its name: mv app/views/layouts/application.html.erb layout_file # temporary change
We’ll write simple tests for each of the titles by combining the tests with the assert_select method, which lets us test for the presence of a particular HTML tag (sometimes called a selector, hence the name)
# test/controllers/static_pages_controller_test.rb
require 'test_helper'

class StaticPagesControllerTest < ActionController::TestCase

  test "should get home" do
    get :home
    assert_response :success
    assert_select "title", "Home | Ruby on Rails Tutorial Sample App"
  end

  test "should get help" do
    get :help
    assert_response :success
    assert_select "title", "Help | Ruby on Rails Tutorial Sample App"
  end

  test "should get about" do
    get :about
    assert_response :success
    assert_select "title", "About | Ruby on Rails Tutorial Sample App"
  end
end
Now the tests will fail:
$ bundle exec rake test
3 tests, 6 assertions, 3 failures, 0 errors, 0 skips
Lets add the titles (shown for home page):
<!DOCTYPE html>
<html>
  <head>
    <title>Home | Ruby on Rails Tutorial Sample App</title>
  </head>
  <body>
    <h1>Sample App</h1>
    <p>
      This is the home page for the
      <a href="http://www.railstutorial.org/">Ruby on Rails Tutorial</a>
      sample application.
    </p>
  </body>
</html>
Do the same for other pages. Now the tests will pass:
$ bundle exec rake test
3 tests, 6 assertions, 0 failures, 0 errors, 0 skips
Refactor - Layouts and embedded Ruby
Generating three valid pages using Rails controllers and actions, but they are purely static HTML and hence don’t show off the power of Rails. Moreover, they suffer from terrible duplication:
- The page titles are almost (but not quite) exactly the same.
- Ruby on Rails Tutorial Sample App is common to all three titles.
- The entire HTML skeleton structure is repeated on each page.
Lets DRY out our code by removing repetition and at the end, we’ll re-run the tests to verify that the titles are still correct.
Lets make the titles of the pages, which are currently quite similar, match exactly. The technique involves using embedded Ruby(ERb) in our views. Since the Home, Help, and About page titles have a variable component, we’ll use a special Rails function called provide to set a different title on each page. For ex. see home:
<% provide(:title, "Home") %>
<!DOCTYPE html>
<html>
  <head>
    <title><%= yield(:title) %> | Ruby on Rails Tutorial Sample App</title>
  </head>
  <body>
    <h1>Sample App</h1>
    <p>
      This is the home page for the
      <a href="http://www.railstutorial.org/">Ruby on Rails Tutorial</a>
      sample application.
    </p>
  </body>
</html>
The distinction between the two types of embedded Ruby is that <% ... %> executes the code inside, while <%= ... %> executes it and inserts the result into the template.
Lets check if we broke anything:
$ bundle exec rake test
3 tests, 6 assertions, 0 failures, 0 errors, 0 skips
Lets make the corresponding replacements for the Help and About pages. Now that we’ve replaced the variable part of the page titles with ERb, each of our pages looks something like this:
```html <% provide(:title, “The Title”) %> <!DOCTYPE html>
```
In other words, all the pages are identical in structure, including the contents of the title tag, with the sole exception of the material inside the body tag. In order to factor out this common structure, Rails comes with a special layout file called application.html.erb: mv layout_file app/views/layouts/application.html.erb
To get the layout to work, we have to replace the default title with the embedded Ruby from the examples above:
<!DOCTYPE html>
<html>
  <head>
    <title><%= yield(:title) %> | Ruby on Rails Tutorial Sample App</title>
    <%= stylesheet_link_tag    'application', media: 'all',
                                              'data-turbolinks-track' => true %>
    <%= javascript_include_tag 'application', 'data-turbolinks-track' => true %>
    <%= csrf_meta_tags %> <!-- Rails method csrf_meta_tags, which prevents cross-site request forgery (CSRF), a type of malicious web attack -->
  </head>
  <body>
    <%= yield %>
  </body>
</html>
Not the special line <%= yield %>, this code is responsible for inserting the contents of each page into the layout.
Lets modify our views (home):
<% provide(:title, "Home") %>
<h1>Sample App</h1>
<p>
  This is the home page for the
  <a href="http://www.railstutorial.org/">Ruby on Rails Tutorial</a>
  sample application.
</p>
Lets test if the refactoring breaks anything:
$ bundle exec rake test
3 tests, 6 assertions, 0 failures, 0 errors, 0 skips
Setting the root route
# config/routes.rb
Rails.application.routes.draw do
  root 'static_pages#home'
  get  'static_pages/help'
  get  'static_pages/about'
end
Refactoring test
Lets use the setup method to remove the repetition in out test:
# test/controllers/static_pages_controller_test.rb
require 'test_helper'

class StaticPagesControllerTest < ActionController::TestCase

  def setup
    @base_title = "Ruby on Rails Tutorial Sample App"
  end

  test "should get home" do
    get :home
    assert_response :success
    assert_select "title", "Home | #{@base_title}"
  end

  test "should get help" do
    get :help
    assert_response :success
    assert_select "title", "Help | #{@base_title}"
  end

  test "should get about" do
    get :about
    assert_response :success
    assert_select "title", "About | #{@base_title}"
  end
end
Lets add contact page
Lets try using rails g. This will show conflict. So lets do it manually:
-
Add test
ruby test 'should get contact' do get :contact assert_response :success assert_select 'title', "Contact | #{@base_title}" end - Add the route
- Add controller action
-
Add the view
```html <% provide(:title, “Contact”) %>
Contact
Contact the Ruby on Rails Tutorial about the sample app at the contact page.
```
- Run the tests
Advanced testing setup
There are three main elements
- an enhanced pass/fail reporter
- a utility to filter the backtrace produced by failing tests
- an automated test runner that detects file changes and automatically runs the corresponding tests
minitest reporters
To get the default Rails tests to show red and green at the appropriate times, add to your test helper file:
# test/test_helper.rb
ENV['RAILS_ENV'] ||= 'test'
require File.expand_path('../../config/environment', __FILE__)
require 'rails/test_help'
require "minitest/reporters"
Minitest::Reporters.use!

class ActiveSupport::TestCase
  # Setup all fixtures in test/fixtures/*.yml for all tests in alphabetical
  # order.
  fixtures :all

  # Add more helper methods to be used by all tests here...
end
Backtrace silencer
Upon encountering an error or failing test, the test runner shows a stack trace. While this backtrace is usually very useful for tracking down the problem, on some systems (including the cloud IDE) it goes past the application code and into the various gem dependencies, including Rails itself. The resulting backtrace is often inconveniently long, especially since the source of the problem is usually the application and not one of its dependencies.
The solution is to filter the backtrace to eliminate unwanted lines. This requires the mini_backtrace gem, combined with a backtrace silencer.
#config/initializers/backtrace_silencers.rb

# Be sure to restart your server when you modify this file.

# You can add backtrace silencers for libraries that you're using but don't
# wish to see in your backtraces.
Rails.backtrace_cleaner.add_silencer { |line| line =~ /rvm/ }

# You can also remove all the silencers if you're trying to debug a problem
# that might stem from framework code.
# Rails.backtrace_cleaner.remove_silencers!
Automated tests with Guard
One annoyance associated with using the rake test command is having to switch to the command line and run the tests by hand. To avoid this inconvenience, we can use Guard to automate the running of the tests. Guard monitors changes in the filesystem so that, for example, when we change the static_pages_controller_test.rb file, only those tests get run. Even better, we can configure Guard so that when, say, the home.html.erb file is modified, the static_pages_controller_test.rb automatically runs.
The Gemfile has already included the guard gem in our application, so to get started we just need to initialize it:
$ bundle exec guard init
16:09:09 - INFO - Writing new Guardfile to /Users/aapa/Projects/ruby_workspace/sample_app/Guardfile
16:09:10 - INFO - minitest guard added to Guardfile, feel free to edit it
Edit the GueardFile:
# Defines the matching rules for Guard.
guard :minitest, spring: true, all_on_start: false do
  watch(%r{^test/(.*)/?(.*)_test\.rb$})
  watch('test/test_helper.rb') { 'test' }
  watch('config/routes.rb')    { integration_tests }
  watch(%r{^app/models/(.*?)\.rb$}) do |matches|
    "test/models/#{matches[1]}_test.rb"
  end
  watch(%r{^app/controllers/(.*?)_controller\.rb$}) do |matches|
    resource_tests(matches[1])
  end
  watch(%r{^app/views/([^/]*?)/.*\.html\.erb$}) do |matches|
    ["test/controllers/#{matches[1]}_controller_test.rb"] +
    integration_tests(matches[1])
  end
  watch(%r{^app/helpers/(.*?)_helper\.rb$}) do |matches|
    integration_tests(matches[1])
  end
  watch('app/views/layouts/application.html.erb') do
    'test/integration/site_layout_test.rb'
  end
  watch('app/helpers/sessions_helper.rb') do
    integration_tests << 'test/helpers/sessions_helper_test.rb'
  end
  watch('app/controllers/sessions_controller.rb') do
    ['test/controllers/sessions_controller_test.rb',
     'test/integration/users_login_test.rb']
  end
  watch('app/controllers/account_activations_controller.rb') do
    'test/integration/users_signup_test.rb'
  end
  watch(%r{app/views/users/*}) do
    resource_tests('users') +
    ['test/integration/microposts_interface_test.rb']
  end
end

# Returns the integration tests corresponding to the given resource.
def integration_tests(resource = :all)
  if resource == :all
    Dir["test/integration/*"]
  else
    Dir["test/integration/#{resource}_*.rb"]
  end
end

# Returns the controller tests corresponding to the given resource.
def controller_test(resource)
  "test/controllers/#{resource}_controller_test.rb"
end

# Returns all tests for the given resource.
def resource_tests(resource)
  integration_tests(resource) << controller_test(resource)
end
The line guard :minitest, spring: true, all_on_start: false do causes Guard to use the Spring server supplied by Rails to speed up loading times, while also preventing Guard from running the full test suite upon starting.
To prevent conflicts between Spring and Git when using Guard, you should add the spring/ directory to the .gitignore file.
To kill the spring:
pkill -9 -f spring
Lets run the guard: bundle exec guard
Chapter 4 Rails-flavored Ruby
Ruby in rails
Lets start with the embedded ruby code we used in last chapter for our app/views/layouts/application.html.erb page:
<!DOCTYPE html>
<html>
  <head>
    <title><%= yield(:title) %> | Ruby on Rails Tutorial Sample App</title>
    <%= stylesheet_link_tag    'application', media: 'all',
                                              'data-turbolinks-track' => true %>
    <%= javascript_include_tag 'application', 'data-turbolinks-track' => true %>
    <%= csrf_meta_tags %>
  </head>
  <body>
    <%= yield %>
  </body>
</html>
<%= stylesheet_link_tag 'application', media: 'all', 'data-turbolinks-track' => true %> line uses the built-in Rails function stylesheet_link_tag to include application.css for all media types. There are four Ruby ideas in this line:
- built-in Rails methods
- method invocation with missing parentheses
- symbols
- hashes
In addition to coming equipped with a large number of built-in functions for use in the views, Rails also allows the creation of new ones. Such functions are called helpers.
<%= yield(:title) %> | Ruby on Rails Tutorial Sample App line relies on definition of a page title (using provide) in each view. What if we don’t provide a title, it will render _ |
Ruby on Rails Tutorial Sample App_. To solve the problem of a missing page title, we’ll define a custom helper called full_title: |
# app/helpers/application_helper.rb
module ApplicationHelper

  # Returns the full title on a per-page basis.
  def full_title(page_title = '')
    base_title = "Ruby on Rails Tutorial Sample App"
    if page_title.empty?
      base_title
    else
      page_title + " | " + base_title
    end
  end
end
Now we can use <title><%= full_title(yield(:title)) %></title> for our title in the layout file. And then remove the Home from the test case and then from home page from the title.
Strings
Rails console is built on top of interactive Ruby (irb), and thus has access to the full power of the Ruby language. By default, the console starts in a development environment, which is one of three separate environments defined by Rails (the others are test and production).
irb(main):007:0> first_name = 'Michael'
=> "Michael"
irb(main):008:0> last_name = 'Hartl'
=> "Hartl"
irb(main):009:0> first_name + " " + last_name    # Concatenation, with a space in between
=> "Michael Hartl"
irb(main):010:0> "#{first_name} #{last_name}"    # The equivalent interpolation
=> "Michael Hartl"
irb(main):011:0> '#{first_name} #{last_name}'    # Interpolation doesn't work on single quotes
=> "\#{first_name} \#{last_name}"
irb(main):012:0>

irb(main):016:0* '\n'
=> "\\n"
irb(main):017:0> "\n"
=> "\n"
irb(main):018:0> puts "\n"

=> nil
irb(main):019:0> puts '\n'
\n
=> nil
irb(main):020:0>
If double-quoted strings can do everything that single-quoted strings can do, and interpolate to boot, what’s the point of single-quoted strings? They are often useful because they are truly literal, and contain exactly the characters you type.
puts is used to print. puts automatically appends a newline character \n to the output.
>> puts "foo"     # put string
foo
=> nil

>> print "foo"    # print string (same as puts, but without the newline)
foo=> nil
>> print "foo\n"  # Same as puts "foo"
foo
=> nil
Objects and message passing
Everything in Ruby, including strings and even nil, is an object. Objects respond to messages. An object like a string, for example, can respond to the message length,
>> nil.to_s
=> ""

>> nil.empty?
NoMethodError: undefined method `empty?' for nil:NilClass
>> nil.to_s.empty?      # Message chaining
=> true

>> "foo".nil?
=> false
>> "".nil?
=> false
>> nil.nil?
=> true
Question mark at the end of the empty? method. This is a Ruby convention indicating that the return value is boolean: true or false.
>> s = "foobar"
>> if s.nil?
>>   "The variable is nil"
>> elsif s.empty?
>>   "The string is empty"
>> elsif s.include?("foo")
>>   "The string includes 'foo'"
>> end
=> "The string includes 'foo'"

#logical operators

>> x = "foo"
=> "foo"
>> y = ""
=> ""
>> puts "Both strings are empty" if x.empty? && y.empty?
=> nil
>> puts "One of the strings is empty" if x.empty? || y.empty?
"One of the strings is empty"
=> nil
>> puts "x is not empty" if !x.empty?
"x is not empty"
=> nil
The alternate use of the if keyword allows you to write a statement that is evaluated only if the statement following if is true. There’s a complementary unless keyword that works the same way.
>> string = "foobar"
>> puts "The string '#{string}' is nonempty." unless string.empty?
The string 'foobar' is nonempty.
=> nil
It’s worth noting that the nil object is special, in that it is the only Ruby object that is false in a boolean context, apart from false itself.
>> !!nil
=> false

>> !!0
=> true
Method definitions
>> def string_message(str = '')
>>   if str.empty?
>>     "It's an empty string!"
>>   else
>>     "The string is nonempty."
>>   end
>> end
=> :string_message
>> puts string_message("foobar")
The string is nonempty.
>> puts string_message("")
It's an empty string!
>> puts string_message
It's an empty string!
It’s possible to leave out the argument entirely (in which case we can also omit the parentheses). Ruby functions have an implicit return, meaning they return the last statement evaluated. Ruby also has an explicit return option; the following function is equivalent to the one above:
>> def string_message(str = '')
>>   return "It's an empty string!" if str.empty?
>>   return "The string is nonempty."
>> end
Back to tile helper
# app/helpers/application_helper.rb
module ApplicationHelper

  # Returns the full title on a per-page basis.       # Documentation comment
  def full_title(page_title = '')                     # Method def, optional arg
    base_title = "Ruby on Rails Tutorial Sample App"  # Variable assignment
    if page_title.empty?                              # Boolean test
      base_title                                      # Implicit return
    else
      page_title + " | " + base_title                 # String concatenation
    end
  end
end
The final element is module ApplicationHelper, modules give us a way to package together related methods, which can then be mixed in to Ruby classes using include. When writing ordinary Ruby, you often write modules and include them explicitly yourself, but in the case of a helper module Rails handles the inclusion for us. The result is that the full_title method is automagically available in all our views.
Arrays
>>  "foo bar     baz".split     # Split a string into a three-element array.
=> ["foo", "bar", "baz"]

>> "fooxbarxbazx".split('x')
=> ["foo", "bar", "baz"]

>> a = [42, 8, 17]
=> [42, 8, 17]
>> a[0]               # Ruby uses square brackets for array access.
=> 42
>> a[1]
=> 8
>> a[2]
=> 17
>> a[-1]              # Indices can even be negative!
=> 17

>> a                  # Just a reminder of what 'a' is
=> [42, 8, 17]
>> a.first
=> 42
>> a.second
=> 8
>> a.last
=> 17
>> a.last == a[-1]    # Comparison using ==
=> true

# Equality operators
>> x = a.length       # Like strings, arrays respond to the 'length' method.
=> 3
>> x == 3
=> true
>> x == 1
=> false
>> x != 1
=> true
>> x >= 1
=> true
>> x < 1
=> false

# Array methods
>> a
=> [42, 8, 17]
>> a.empty?
=> false
>> a.include?(42)
=> true
>> a.sort
=> [8, 17, 42]
>> a.reverse
=> [17, 8, 42]
>> a.shuffle
=> [17, 42, 8]
>> a
=> [42, 8, 17]

>> a.push(6)                  # Pushing 6 onto an array
=> [42, 8, 17, 6]
>> a << 7                     # Pushing 7 onto an array
=> [42, 8, 17, 6, 7]
>> a << "foo" << "bar"        # Chaining array pushes
=> [42, 8, 17, 6, 7, "foo", "bar"]     # Ruby arrays can contain a mixture of different types

>> a
=> [42, 8, 17, 7, "foo", "bar"]
>> a.join                       # Join on nothing.
=> "428177foobar"
>> a.join(', ')                 # Join on comma-space.
=> "42, 8, 17, 7, foo, bar"
Note that none of the methods above changes a itself. To mutate the array, use the corresponding bang methods:
>> a
=> [42, 8, 17]
>> a.sort!
=> [8, 17, 42]
>> a
=> [8, 17, 42]
Ranges
Closely related to arrays are ranges, which can probably most easily be understood by converting them to arrays using the to_a method:
>> 0..9
=> 0..9
>> 0..9.to_a              # Oops, call to_a on 9.
NoMethodError: undefined method `to_a' for 9:Fixnum
>> (0..9).to_a            # Use parentheses to call to_a on the range.
=> [0, 1, 2, 3, 4, 5, 6, 7, 8, 9]

>> a = %w[foo bar baz quux]         # Use %w to make a string array.
=> ["foo", "bar", "baz", "quux"]
>> a[0..2]
=> ["foo", "bar", "baz"]

>> a = (0..9).to_a
=> [0, 1, 2, 3, 4, 5, 6, 7, 8, 9]
>> a[2..(a.length-1)]               # Explicitly use the array's length.
=> [2, 3, 4, 5, 6, 7, 8, 9]
>> a[2..-1]                         # Use the index -1 trick.
=> [2, 3, 4, 5, 6, 7, 8, 9]


>> ('a'..'e').to_a                  # Ranges also work with characters
=> ["a", "b", "c", "d", "e"]
Blocks
Both arrays and ranges respond to a host of methods that accept blocks, which are simultaneously one of Ruby’s most powerful and most confusing features:
>> (1..5).each { |i| puts 2 * i }
2
4
6
8
10
=> 1..5
This code calls the each method on the range (1..5) and passes it the block { |i| puts 2 * i }. The vertical bars around the variable name in |i| are Ruby syntax for a block variable, and it’s up to the method to know what to do with the block. In this case, the range’s each method can handle a block with a single local variable, which we’ve called i, and it just executes the block for each value in the range.
Curly braces are one way to indicate a block, but there is a second way as well:
>> (1..5).each do |i|
?>   puts 2 * i
>> end
2
4
6
8
10
=> 1..5
Some things one can do with blocks:
>> (1..5).each do |number|
?>   puts 2 * number
>>   puts '--'
>> end
2
--
4
--
6
--
8
--
10
--
=> 1..5


>> 3.times { puts "Betelgeuse!" }   # 3.times takes a block with no variables.
"Betelgeuse!"
"Betelgeuse!"
"Betelgeuse!"
=> 3
>> (1..5).map { |i| i**2 }          # The ** notation is for 'power'.
=> [1, 4, 9, 16, 25]
>> %w[a b c]                        # Recall that %w makes string arrays.
=> ["a", "b", "c"]
>> %w[a b c].map { |char| char.upcase }
=> ["A", "B", "C"]
>> %w[A B C].map { |char| char.downcase }
=> ["a", "b", "c"]


>> %w[A B C].map { |char| char.downcase }
=> ["a", "b", "c"]
>> %w[A B C].map(&:downcase)        # (This strange-looking but compact code uses a symbol
=> ["a", "b", "c"]


test "should get home" do
  get :home
  assert_response :success
  assert_select "title", "Ruby on Rails Tutorial Sample App"
end
The test method takes in a string argument (the description) and a block, and then executes the body of the block as part of running the test suite.
Let see how ('a'..'z').to_a.shuffle[0..7].join works:
>> ('a'..'z').to_a                     # An alphabet array
=> ["a", "b", "c", "d", "e", "f", "g", "h", "i", "j", "k", "l", "m", "n", "o",
"p", "q", "r", "s", "t", "u", "v", "w", "x", "y", "z"]
>> ('a'..'z').to_a.shuffle             # Shuffle it.
=> ["c", "g", "l", "k", "h", "z", "s", "i", "n", "d", "y", "u", "t", "j", "q",
"b", "r", "o", "f", "e", "w", "v", "m", "a", "x", "p"]
>> ('a'..'z').to_a.shuffle[0..7]       # Pull out the first eight elements.
=> ["f", "w", "i", "a", "h", "p", "c", "x"]
>> ('a'..'z').to_a.shuffle[0..7].join  # Join them together to make one string.
=> "mznpybuj"
Hashes and symbols
Hashes are essentially arrays that aren’t limited to integer indices. Instead, hash indices, or keys, can be almost any object. For example, we can use strings as keys:
>> user = {}                          # {} is an empty hash.
=> {}
>> user["first_name"] = "Michael"     # Key "first_name", value "Michael"
=> "Michael"
>> user["last_name"] = "Hartl"        # Key "last_name", value "Hartl"
=> "Hartl"
>> user["first_name"]                 # Element access is like arrays.
=> "Michael"
>> user                               # A literal representation of the hash
=> {"last_name"=>"Hartl", "first_name"=>"Michael"}


>> user = { "first_name" => "Michael", "last_name" => "Hartl" }
=> {"last_name"=>"Hartl", "first_name"=>"Michael"}
Symbols look kind of like strings, but prefixed with a colon instead of surrounded by quotes. For example, :name is a symbol. You can think of symbols as basically strings without all the extra baggage.
>> "name".split('')
=> ["n", "a", "m", "e"]
>> :name.split('')
NoMethodError: undefined method `split' for :name:Symbol
>> "foobar".reverse
=> "raboof"
>> :foobar.reverse
NoMethodError: undefined method `reverse' for :foobar:Symbol


# Unlike strings, not all characters are valid:
>> :foo-bar
NameError: undefined local variable or method `bar' for main:Object
>> :2foo
SyntaxError


>> user = { :name => "Michael Hartl", :email => "michael@example.com" }
=> {:name=>"Michael Hartl", :email=>"michael@example.com"}
>> user[:name]              # Access the value corresponding to :name.
=> "Michael Hartl"
>> user[:password]          # Access the value of an undefined key.
=> nil


# Since it’s so common for hashes to use symbols as keys, as of version 1.9 Ruby supports a new syntax just for this special case:
>> h1 = { :name => "Michael Hartl", :email => "michael@example.com" }
=> {:name=>"Michael Hartl", :email=>"michael@example.com"}
>> h2 = { name: "Michael Hartl", email: "michael@example.com" }
=> {:name=>"Michael Hartl", :email=>"michael@example.com"}
>> h1 == h2
=> true


# Nested hashes
>> params = {}        # Define a hash called 'params' (short for 'parameters').
=> {}
>> params[:user] = { name: "Michael Hartl", email: "mhartl@example.com" }
=> {:name=>"Michael Hartl", :email=>"mhartl@example.com"}
>> params
=> {:user=>{:name=>"Michael Hartl", :email=>"mhartl@example.com"}}
>>  params[:user][:email]
=> "mhartl@example.com"


# Each on hashes
>> flash = { success: "It worked!", danger: "It failed." }
=> {:success=>"It worked!", :danger=>"It failed."}
>> flash.each do |key, value|
?>   puts "Key #{key.inspect} has value #{value.inspect}"
>> end
Key :success has value "It worked!"
Key :danger has value "It failed."


# The last example uses the useful inspect method, which returns a string with a literal representation of the object it’s called on:
>> puts (1..5).to_a            # Put an array as a string.
1
2
3
4
5
>> puts (1..5).to_a.inspect    # Put a literal array.
[1, 2, 3, 4, 5]
>> puts :name, :name.inspect
name
:name
>> puts "It worked!", "It worked!".inspect
It worked!
"It worked!"


# By the way, using inspect to print an object is common enough that there’s a shortcut for it, the p function:11
>> p :name             # Same output as 'puts :name.inspect'
:name
CSS revisited
<%= stylesheet_link_tag 'application', media: 'all', 'data-turbolinks-track' => true %>

# its a function call
stylesheet_link_tag 'application', media: 'all', 'data-turbolinks-track' => true
The media argument sure looks like a hash, but where are the curly braces? When hashes are the last argument in a function call, the curly braces are optional, so these two are equivalent:
ruby
 # Curly braces on final hash arguments are optional.
 stylesheet_link_tag 'application', { media: 'all', 'data-turbolinks-track' => true }
 stylesheet_link_tag 'application', media: 'all', 'data-turbolinks-track' => true
Next, why does the data-turbolinks-track key-value pair use the old-style hashrocket syntax? This is because using the newer syntax to write data-turbolinks-track: true is invalid because of the hyphens.
Finally, why does Ruby correctly interpret the lines even with a line break between the final elements? The answer is that Ruby doesn’t distinguish between newlines and other whitespace in this context.
So, we see now that the line stylesheet_link_tag 'application', media: 'all', 'data-turbolinks-track' => true calls the stylesheet_link_tag function with two arguments: a string, indicating the path to the stylesheet, and a hash with two elements, indicating the media type and telling Rails to use the turbolinks feature added in Rails 4.0. Because of the <%= %> brackets, the results are inserted into the template by ERb, and if you view the source of the page in your browser you should see the HTML needed to include a stylesheet (Listing 4.11). (You may see some extra things, like ?body=1, after the CSS filenames. These are inserted by Rails to ensure that browsers reload the CSS when it changes on the server.)
Constructors
Ruby, like many object-oriented languages, uses classes to organize methods; these classes are then instantiated to create objects.
>> s = "foobar"       # A literal constructor for strings using double quotes
=> "foobar"
>> s.class
=> String


>> s = String.new("foobar")   # A named constructor for a string
=> "foobar"
>> s.class
=> String
>> s == "foobar"
=> true


>> a = Array.new([1, 3, 2])
=> [1, 3, 2]


# Hashes, in contrast, are different. While the array constructor Array.new takes an initial value for the array, Hash.new takes a default value for the hash, which is the value of the hash for a nonexistent key:
>> h = Hash.new
=> {}
>> h[:foo]            # Try to access the value for the nonexistent key :foo.
=> nil
>> h = Hash.new(0)    # Arrange for nonexistent keys to return 0 instead of nil.
=> {}
>> h[:foo]
=> 0
Class inheritance
When learning about classes, it’s useful to find out the class hierarchy using the superclass method:
>> s = String.new("foobar")
=> "foobar"
>> s.class                        # Find the class of s.
=> String
>> s.class.superclass             # Find the superclass of String.
=> Object
>> s.class.superclass.superclass  # Ruby 1.9 uses a new BasicObject base class
=> BasicObject
>> s.class.superclass.superclass.superclass
=> nil
Defining your own classes:
>> class Word
>>   def palindrome?(string)
>>     string == string.reverse
>>   end
>> end
=> :palindrome?


>> w = Word.new              # Make a new Word object.
=> #<Word:0x22d0b20>
>> w.palindrome?("foobar")
=> false
>> w.palindrome?("level")
=> true
Since a word is a string, it’s more natural to have our Word class inherit from String. (You should exit the console and re-enter it to clear out the old definition of Word.)
>> class Word < String             # Word inherits from String.
>>   # Returns true if the string is its own reverse.
>>   def palindrome?
>>     self == self.reverse        # self is the string itself.
>>   end
>> end
=> nil
# Ruby allows us to do this using the self keyword: inside the Word class, self is the object itself, which means we can use
# In fact, inside the String class the use of self. is optional on a method or attribute (unless we’re making an assignment), so `self == reverse` would work as well.


>> s = Word.new("level")    # Make a new Word, initialized with "level".
=> "level"
>> s.palindrome?            # Words have the palindrome? method.
=> true
>> s.length                 # Words also inherit all the normal string methods.
=> 5
Modifying built-in classes
While inheritance is a powerful idea, in the case of palindromes it might be even more natural to add the palindrome? method to the String class itself, so that (among other things) we can call palindrome? on a string literal, which we currently can’t do:
>> "level".palindrome?
NoMethodError: undefined method `palindrome?' for "level":String
Amazingly, Ruby lets you do just this; Ruby classes can be opened and modified, allowing ordinary mortals such as ourselves to add methods to them:
>> class String
>>   # Returns true if the string is its own reverse.
>>   def palindrome?
>>     self == self.reverse
>>   end
>> end
=> nil
>> "deified".palindrome?
=> true
Modifying built-in classes is a powerful technique, but with great power comes great responsibility, and it’s considered bad form to add methods to built-in classes without having a really good reason for doing so. Rails does have some good reasons; for example, in web applications we often want to prevent variables from being blank—e.g., a user’s name should be something other than spaces and other whitespace—so Rails adds a blank? method to Ruby.
>> "".blank?
=> true
>> "      ".empty?
=> false
>> "      ".blank?
=> true
>> nil.blank?
=> true
A controller class
class StaticPagesController < ApplicationController

  def home
  end

  def help
  end

  def about
  end
end
Since each Rails console session loads the local Rails environment, we can even create a controller explicitly and examine its class hierarchy:
>> controller = StaticPagesController.new
=> #<StaticPagesController:0x22855d0>
>> controller.class
=> StaticPagesController
>> controller.class.superclass
=> ApplicationController
>> controller.class.superclass.superclass
=> ActionController::Base
>> controller.class.superclass.superclass.superclass
=> ActionController::Metal
>> controller.class.superclass.superclass.superclass.superclass
=> AbstractController::Base
>> controller.class.superclass.superclass.superclass.superclass.superclass
=> Object


>> controller.home
=> nil
But wait—actions don’t have return values, at least not ones that matter. The point of the home action is to render a web page, not to return a value. And I sure don’t remember ever calling StaticPagesController.new anywhere. What’s going on?
What’s going on is that Rails is written in Ruby, but Rails isn’t Ruby. Some Rails classes are used like ordinary Ruby objects, but some are just grist for Rails’ magic mill.
A user class
# example_user.rb
class User
  attr_accessor :name, :email           # This creates “getter” and “setter” methods that allow us to retrieve (get) and assign (set) @name and @email instance variables

  def initialize(attributes = {})
    @name  = attributes[:name]
    @email = attributes[:email]
  end

  def formatted_email
    "#{@name} <#{@email}>"
  end
end
>> require './example_user'     # This is how you load the example_user code.
=> true
>> example = User.new
=> #<User:0x224ceec @email=nil, @name=nil>
>> example.name                 # nil since attributes[:name] is nil
=> nil
>> example.name = "Example User"           # Assign a non-nil name
=> "Example User"
>> example.email = "user@example.com"      # and a non-nil email address
=> "user@example.com"
>> example.formatted_email
=> "Example User <user@example.com>"
## Reference