Modern web app architecture - Ember
Currently while planning for scupids my team decided to use some new backend & frontend technologies/frameworks for our next idea. For the frontend we decided to use Ember. So to get started with ember Vipul gave me this tutorial to follow and here are my notes for the same.
Introduction
There are many different ways to build an open web application, including a lot of different tool choices, and a lot of new theory to learn. If you’re just starting to build complex modern web applications and have tried to research what tools to use, it’s easy to become frustrated by the sheer number of choices available. The tools used in this tutorial are part of the Mozilla Recommended Toolchain. The main tool for this tutorial is Ember.js/Ember CLI. Ember.js is a well-known framework for rapid development of MVC applications, and Ember CLI is a command line interface for generating Ember code.
MVC architecture
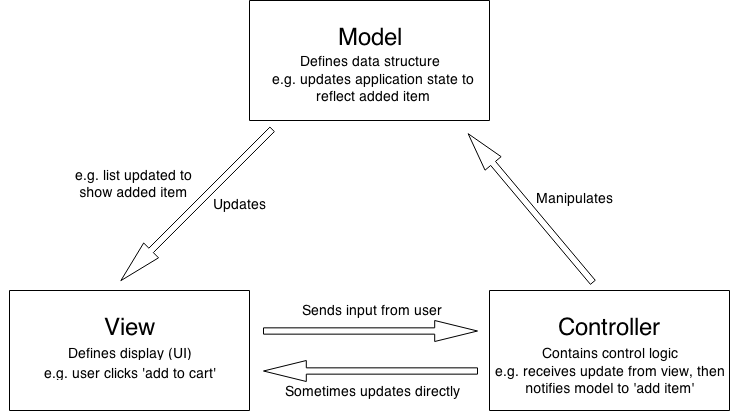
In general, it separates out the application logic into three separate parts, promoting modularity and ease of collaboration and reuse. It also makes applications more flexible and welcoming to iterations.
Example: Let’s imagine a simple shopping list app. All we want is a list of the name, quantity and price of each item we need to buy this week.
The Model
The model defines what data the app should contain. If the state of this data changes, then the model will usually notify the view (so the display can change as needed) and sometimes the controller (if different logic is needed to control the updated view).
Going back to our shopping list app, the model would specify what data the list items should contain — item, price, etc. — and what list items are already present.
The View
The view defines how the app’s data should be displayed.
In our shopping list app, the view would define how the list is presented to the user, and receive the data to display from the model.
The Controller
The controller contains logic that updates the model and/or view in response to input from the users of the app.
Using Model: So for example, our shopping list could have input forms and buttons that allow us to add or delete items. These actions require the model to be updated, so the input is sent to the controller, which then manipulates the model as appropriate, which then sends updated data to the view.
Directly: You might however also want to just update the view to display the data in a different format, e.g., change the item order to alphabetical, or lowest to highest price. In this case the controller could handle this directly without needing to update the model.
Evolution of MVC on the web
In the early days of the Web, MVC architecture was mostly implemented on the server-side, with the client requesting updates via forms or links, and receiving updated views back to display in the browser. However, these days, more of the logic is pushed to the client with the advent of client-side data stores, and XMLHttpRequest allowing partial page updates as required.
Ember’s MVC
Ember implements MVC according to a strict set of concepts and rules. Some important ember resources:
- Core Concepts
- Naming Conventions - are enforced strictly to allow associated objects to talk to each other easily without a lot of extra cruft to link them together.
- Ember CLI - to automate a lot of process
Ember View layer
In Ember, views are slightly different to how they are in general MVC. In MVC terms, we usually think of the view as being the entire UI layer, whereas in Ember a view is another specific component of the UI, along with routes and templates.
- A typical simple Ember.js UI uses
Routeobjects andtemplatefiles to handle Views. - Routes specify the URL at which a certain template will be accessible and can also specify what model that template should display data from.
- Each route is represented by a JavaScript file.
-
Templates specify what the UI should look like, and are represented by Handlebars template files (
.hbs). These files are HTML with special dynamic expressions inserted in them, contained in double curly braces.```html
{{title}}
{{body}}```
- These properties will automatically update in the template when the Model/Controller changes.
- Ember CLI can generate a route and associated template using the following command:
ember generate route my-route-name. This will generate:- A JavaScript file in your-app-root/app/routes to control the route.
- A Handlebars template in your-app-root/app/templates to define the content that will appear at the named URL.
- A unit test file in your-app-root/tests/unit/routes where you can define a test for the functionality at your route.
-
The route file will contain a basic skeleton for you to start writing any necessary route logic:
```javascript import Ember from ‘ember’;
export default Ember.Route.extend({ // your own features, as required }); ```
- The route and template files will both be called the same thing, for example shopping-list.js and shopping-list.hbs, so they associate together by default; the view is then available to the user at
your-server.com/shopping-list/.
Ember Controllers
Ember.js represents Controllers using controller objects, which are contained in JavaScript files.
- Ember CLI can generate a controller using the following syntax:
ember generate controller name-of-my-controller. This will create two new files:- A JavaScript file in your-app-root/app/controllers to control that particular model/view.
- A unit test file in your-app-root/tests/unit/controllers where you can define a test for the functionality in your controller.
-
So for our shopping list example, if we already have a route and template called shopping-list, it would make sense to generate a controller called shopping-list. The generated controller file contains this:
```javascript import Ember from ‘ember’;
export default Ember.Controller.extend({ // your own features, as required }); ```
Ember Models
Ember.js represents Models using model objects, which as before are contained in JavaScript files.
- Ember CLI can generate a model using the following syntax:
ember generate model name-of-my-model. This will create two new files:- A JavaScript file in your-app-root/app/models to define the data to be associated wth this particular view.
- A unit test file in your-app-root/tests/unit/models where you can define a test for the functionality in your model.
-
So for our shopping list example, it would make sense to generate a model called shopping-list. The generated model file contains this:
```javascript import DS from ‘ember-data’;
export default DS.Model.extend({ // your own features, as required }); ```
Sample World Clock App
Original Demo, Original Source Code.
Installing toolset
External libs used:
- Handlebars for writing application templates. Ember includes this automatically.
- LocalForage for storing and managing offline data.
- Moment Timezone to provide a list of available timezones, and allow us to easily format them in a more readable way.
Steps:
- Install git
- Install
node.js. Ember CLI requires Node.js. - Ember-cli
npm install -g ember-cli
Setting up
- Creating Project:
ember new world-clock - Serve:
ember serve. Ember CLI also provides a development server that allows you to view and debug your changes as you make them. - Open http://localhost:4200/.
Ember app structure
- dist directory: whenever Ember CLI builds your application, it places the final production-ready files of your app in this directory. You should never edit any of these files directly, as they will be overwritten any time Ember CLI builds your files.
- app directory: this is where you make direct changes to your application’s code. The contents of this directory are built then copied into dist when you run ember serve.
- public directory: where you put raw assets such as fonts and images that don’t require any building. This is copied over to the dist directory unchanged when you run ember serve.
- package.json: contains configuration information, such as the name of the app, and what dependencies it has.
- Brocfile.js: contains details of all the 3rd party libraries, assets, etc. that need to be included when your app is built. Ember CLI asset compilation is based on the broccoli asset pipeline tool: Brocfile.js is broccoli’s build specification file.
A more detailed directory structure explanation can be found here
Routes
We’ll start by adding a clock ‘page’ to our app, to display the current time: ember generate route clock. It will be available at http://localhost:4200/clock.
Templates
-
Our template file has already been generated at app/templates/clock.hbs. Open it up in your text editor and you’ll see that by default this contains only the following:
html {{outlet}} - Replace {{outlet}} with the following:
<h2>Local Time: <strong>{{localTime}}</strong></h2>. -
You’ll notice that the page still renders “Welcome to Ember.js”, albeit with “Local Time: “, underneath it. This is because the welcome message comes from
app/templates/application.hbs. If you look in that file, you’ll see two lines:```html
Welcome to Ember.js
{{outlet}} ```
- When any view is navigated to by the app’s user, application.hbs is shown, but with the view’s template content inserted too.
The main application template
application.hbs is a special template created when you first created the app, which represents the main, or master application view. You are given this automatically so you’ll always have something displayed at the root of your app (i.e. your-server.com/). Whenever you view any “page” in your app, it is actually the application.hbs template that is shown, but with the contents of the route’s corresponding template inserted in place of the {{outlet}}.
Since clock is going to be the only/main page of the app, it’d be nice to have it appear when we go to the root of our domain.
Generating an application route
ember generate route application
At this point you will be prompted with the question [?] Overwrite app/templates/application.hbs?, as application.hbs already exists. It is fine to go ahead and overwrite it. You’ll notice that localhost:4200/clock will now only display “Local time:”, because the new application.hbs only contains {{outlet}}, and not the welcome message.
Making the application route redirect to the clock route
At this point, open your app/routes/application.js file and update the contents like so:
import Ember from 'ember';

export default Ember.Route.extend({
    redirect: function() {
        this.transitionTo('clock');
    }
});
Here we are extending the default Ember Route functionality with a redirect() method that will forward any requests for the root of our application to the clock route using transitionTo().
Adding links to different displays
In addition to showing the clock on our main page (which we’ll fix in the next article!), we’re going to want some navigation that allows users to toggle between the main clock view, and a view allowing them to choose new timezones to add to the main display.
Update the contents of app/templates/application.hbs to look like this:
<h1 id='title'>It's 5'o'clock somewhere</h1>

<ul>
    <li>{{#link-to 'clock'}}Clock{{/link-to}}</li>
    <li>{{#link-to 'timezones'}}Manage Timezones{{/link-to}}</li>
</ul>

{{outlet}}
{{#link-to}} is a built-in Handlebars helper for creating links — it takes one parameter, the route you want to link to.
If you go to look at your application now, you’ll notice the page is blank. We’ve lost our “Local time:” heading. We must have an error in our code somewhere, so let’s go and investigate now.
Debugging Practice
If you open the console tab in your developer tools, you should see an error coming specifically from Ember: Uncaught Error: There is no route named timezones.
This is because we are trying to link to a timezones route that does not yet exist. We’ll deal with this in a later article, so for now, update the line <li>{{#link-to 'timezones'}}Manage Timezones{{/link-to}}</li> to simply <li>Manage Timezones</li>.
Controllers
Generating a controller for our clock display
Create the controller ember generate controller clock.
Open up app/controllers/clock.js. To set the value of localTime, we will add it as a property within Ember.Controller.extend().
import Ember from 'ember';

export default Ember.Controller.extend({
  localTime: new Date().toLocaleTimeString()
});
Any property inside the controller is accessible inside that controller’s template (in this case app/templates/clock.hbs).
Making the clock update every second
So far, our clock display just shows the time when the controller was initialized — and then doesn’t change. This is not very useful; we ideally want to update it every second.
import Ember from 'ember';

export default Ember.Controller.extend({
    init: function() {
        // Update the time.
        this.updateTime();
    },

    updateTime: function() {
        var _this = this;

        // Update the time every second.
        Ember.run.later(function() {
            _this.set('localTime', new Date().toLocaleTimeString());
            _this.updateTime();
        }, 1000);
    },

    localTime: new Date().toLocaleTimeString()
});
The two methods you’ve added are as follows:
init()is a special method in Ember that runs automatically when the controller is first initialized. You can put whatever set up code you might need here; in this case you are just invoking the updateTime() method.updateTime()usesEmber.run.later()to run the code inside the contained function after 1000ms. The function sets a new value for the localTime property (using the Emberset()method), then runs theupdateTime()function again, so the time is updated after each new second has gone by.
This demonstrates how to work with Ember’s data-binding between controllers and templates.
Note: var
_this = this;is used because of variable scoping in functions — we want to run the functions insideEmber.run.later(function() { ... });onthisas it relates toupdateTime: function() { ... }, so we store a reference to this inside the_thisvariable before we run the inner function. Jack Franklin’s Scope and this in JavaScript provides more context and explanation.
Models and application data
Here we’ll add functionality that enables users to choose additional timezones to display when they click on the timezones link.
Generating resource in Ember
ember generate model name-of-model will generate a model.
In Ember terms, model + route + template together make up a resource. To generate a resource: ember generate resource plural-name-of-model.
Generating a resource for our app
ember generate resource timezones- You can also now revert the change we made to
app/templates/application.hbs— open this file up and change the line<li>Manage Timezones</li>to<li>{{#link-to 'timezones'}}Manage Timezones{{/link-to}}</li>
Ember Data
Our app needs a data store — we want each timezone included in our app to have a name and an offset value associated with it, and be able to save our data on the client-side so the app will work offline.
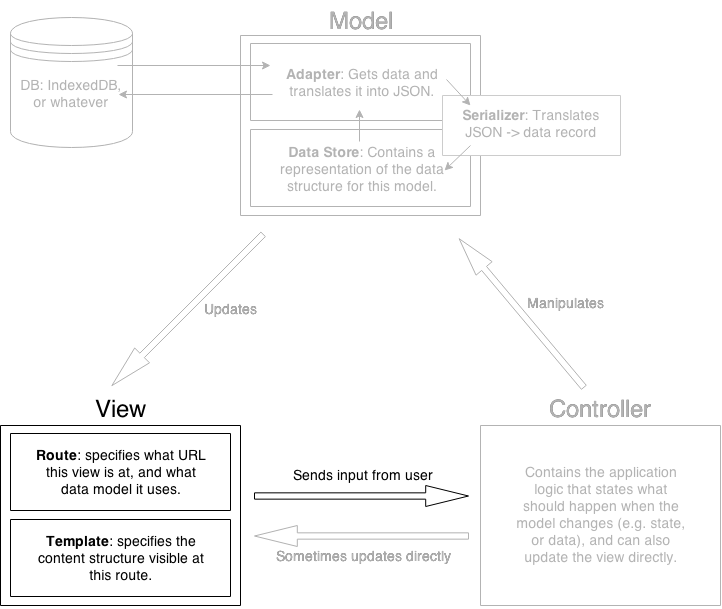
To manage data in Ember apps, we can use Ember Data, a library included with Ember CLI that acts as a data store inside your model. You define data structures in your model using Ember Data, reference the model in your route and the controller/template for your app will then have access to that data. Models don’t have any data themselves; they just define the properties and behavior of specific instances, which are called records.
Ember Data lets you use pretty much any underlying storage mechanism you like to store your application data, as long as there is an adapter available to translate data between the actual data storage mechanism you are using, and Ember data records.
When an app requires data:
- It goes to the model’s data store to find it.
- The data store sends a request to the adapter to return the data to it.
- The adapter goes to the actual data storage mechanism (IndexedDB, RESTful XHR API, whatever), retrieves the data, and converts it into JSON — which the model can understand.
- The model receives the JSON, converts it into a data record via a serializer, and sends it back to the app.
In our case, we’re going to make use of the LocalForage library, which automatically detects data stores available in the browser and selects the most optimal store available (it uses IndexedDB, and then falls back to WebSQL/localStorage for browsers that don’t support the former).
To know more about models click here.
This code simply specifies what the data structure is going to be, according to Ember — a string to contain each timezone name, and a number to contain each timezone’s offset value.
Storing data with LocalForage
Now we’ll install the LocalForage Adapter so we can use it with Ember Data. Do this by running the following command: ember install:addon ember-localforage-adapter. un the following bower command with the specific version: $ bower install localforage -v '1.2.2'
Once Bower has finished installing the LocalForage package, you should see a new localforage directory under world-clock/bower_components.
Creating a new Ember adapter
Now that we’ve included LocalForage and the Ember LocalForage adapter into our app, we have access to an LFAdapter object that we can use to feed data from our data store into Ember Data: we’ll use this to create our timezones database.
Ember allows you to generate an adapter file specifically to contain this code, meaning that it can be kept separate from your models, controllers, etc. Let’s generate our new adapter file using the following command — run this from the root of your project: ember generate adapter application. This generates:
- A JavaScript adapter file at app/adapters that contains our adapter code.
- A JavaScript file at tests/unit/adapters for you to include an adapter unit test in.
You may also have to run bower install to install some missing dependencies — this is fine.
With this done, open up the app/adapters/application.js and replace the code in it with this:
import LFAdapter from 'ember-localforage-adapter/adapters/localforage';

export default LFAdapter.extend({
    namespace: 'WorldTimeZones'
});
This code creates a data store called WorldTimeZones in LocalForage and joins it to our Ember Data instance.
Retrieving records from the data store
Finally, we’ll want to return our timezone records as the model for our timezone route. Setting a model (using Ember.Route’s model method, also see Specifying a route’s model) on a route gives the controller and template access to the data specified so that it can be manipulated and displayed.
Open up app/routes/timezones.js and modify the code inside to look like this:
import Ember from 'ember';

export default Ember.Route.extend({
    model: function() {
        return this.get('store').findAll('timezone');
    }
});
This code simply tells Ember to make the timezone data model available at the timezones route: “let me have access to this data when I navigate to this route, so I can control it with my controller and display it with my template”.
Gathering timezone data
We’re going to want to let users choose from a list of all timezones. For this we’ll use Moment Timezone, an awesome library for dealing with dates and times in JavaScript. This library will give us a list of all available timezones, and allow us to format them in a more readable way.
In order to make sure our app can access the moment scripts when formatting a timezone, we’ll need to edit ember-cli-build.js and .jshintrc in the root of our project.
ember-cli-build.jsan asset pipeline/dependency manager that Ember CLI uses to include dependencies into a project. Ember CLI will look atember-cli-build.jsduring build time, and incorporate any dependencies you specify withapp.import(). This ensures that your application has all the components it needs to function properly.-
ember-cli-build.jswill import the moment scripts our application needs. Add the following two lines intoember-cli-build.js, below thevar app = new EmberApp();line:javascript app.import('bower_components/moment/moment.js'); app.import('bower_components/moment-timezone/builds/moment-timezone-with-data-2010-2020.js'); -
In the
.jshintrcfile, add moment to thepredefarray. This will preventjshint, a code-quality tool included in Ember CLI apps, from throwing errors while checking your code for errors or potential problems.javascript "predef": [ "document", "window", "-Promise", "moment" ]
Warning: So far, we’ve been able to see any changes to our application automatically reflected in the browser without having to refresh or restart the server. However, whenever you edit ember-cli-build.js, you must restart the Ember server.
Interacting with timezone models
Our application should allow users to add a timezone from a select menu, or delete a previously selected timezone. As mentioned before, Ember controllers can be used to manipulate data. When creating the clock, we sent information about the current local time from our clock controller to our clock template. In this example, we’ll send information from our timezones template to our timezones controller through user interactions.
Let’s create a timezones controller that adds the timezone data from Moment.js, and implements two actions: “add” and “remove”.
ember generate controller timezones-
Now update app/controllers/timezones.js to look like so:
```javascript import Ember from ‘ember’;
export default Ember.Controller.extend({ /* create array of timezones with name & offset / init: function() { var timezones = []; for (var i in moment.tz._zones) { timezones.push({ name: moment.tz._zones[i].name, offset: moment.tz._zones[i].offset[0] }); } this.set(‘timezones’, timezones); this._super(); }, selectedTimezone: null, actions: { / save a timezone record to our offline datastore / add: function() { var timezone = this.store.createRecord(‘timezone’, { name: this.get(‘selectedTimezone’).name, offset: this.get(‘selectedTimezone’).offset }); timezone.save(); },
/ delete a timezone record from our offline datastore */ remove: function(timezone) { timezone.destroyRecord(); } } }); ```
Next we’ll modify the timezones template to use the actions and variables we just created. We can use the Ember.SelectView and {{action}} helper to call our add and remove methods — update app/templates/timezones.hbs so it looks like this:
<h2>Add Timezone</h2>

<div>{{ view Ember.Select content=timezones selection=selectedTimezone optionValuePath='content.offset' optionLabelPath='content.name'}}</div>

<button {{action 'add'}}>Add Timezone</button>

<h2>My Timezones</h2>

<ul>
{{#each model}}
  <li>{{name}} <button {{action 'remove' this}}>Delete</button></li>
{{/each}}
</ul>
Also Now I faced a error that offset is not defined. Finally I found the solution and answered it on SO.
Comparing timezones
The last thing we need to do is show these times relative to our local time in our clock route. To do this we need to load the timezone model in the clock route — update the contents of app/routes/clock.js to this:
import Ember from 'ember';
export default Ember.Route.extend({
    model: function() {
        return this.get('store').find('timezone');
    }
});
In our clock controller, we will update each timezone’s current time using moment.js, as well as update our local time — update the contents of app/controllers/clock.js to the following:
import Ember from 'ember';

export default Ember.Controller.extend({
    init: function() {
        // Update the time.
        this.updateTime();
    },

    updateTime: function() {
        var _this = this;

        // Update the time every second.
        Ember.run.later(function() {
            _this.set('localTime', moment().format('h:mm:ss a'));

            _this.get('model').forEach(function(model) {
                model.set('time',
                          moment().tz(model.get('name')).format('h:mm:ss a'));
            });

            _this.updateTime();
        }, 1000);
    },

   localTime: moment().format('h:mm:ss a')
});
Finally, we will add an {{each}} helper to our clock template that will iterate over the timezones in our model and output their name and time properties to our view — update app/templates/clock.hbs like this:
<h2>Local Time: <strong>{{localTime}}</strong></h2>

<ul>
  {{#each model}}
    <li>{{name}}: <strong>{{time}}</strong></li>
  {{/each}}
</ul>
Styling your Ember app
The app structure created by Ember CLI when you first generated your app contains a public directory. The contents of this directory are copied over unchanged to the root of the dist folder when you serve your app with ember serve, so this is where you should put assets to be used in your app, like images and fonts.
Including CSS in your app
The app directory inside your app’s root contains a styles directory, which is where the CSS for your app goes. It contains an app.css file already, so you can put the CSS in there. When the app is served, the CSS is put inside dist/assets/ — you’ll see world-clock.css in there after running ember serve.
Add the following sample CSS into app.css, replacing the font and image references with your own:
@font-face {
    font-family: 'antoniolight';
    src: url('../fonts/antonio/antonio-light-webfont.eot');
    src: url('../fonts/antonio/antonio-light-webfont.eot?#iefix') format('embedded-opentype'),
         url('../fonts/antonio/antonio-light-webfont.woff2') format('woff2'),
         url('../fonts/antonio/antonio-light-webfont.woff') format('woff'),
         url('../fonts/antonio/antonio-light-webfont.ttf') format('truetype'),
         url('../fonts/antonio/antonio-light-webfont.svg#antoniolight') format('svg');
    font-weight: normal;
    font-style: normal;

}

@font-face {
    font-family: 'ds-digitalnormal';
    src: url('../fonts/ds_digital/ds-digi-webfont.eot');
    src: url('../fonts/ds_digital/ds-digi-webfont.eot?#iefix') format('embedded-opentype'),
         url('../fonts/ds_digital/ds-digi-webfont.woff2') format('woff2'),
         url('../fonts/ds_digital/ds-digi-webfont.woff') format('woff'),
         url('../fonts/ds_digital/ds-digi-webfont.ttf') format('truetype'),
         url('../fonts/ds_digital/ds-digi-webfont.svg#ds-digitalnormal') format('svg');
    font-weight: normal;
    font-style: normal;

}

html, body {
  margin: 0px;
}

html {
  font-family: 'antoniolight', sans-serif;
  background: white;
}

body {
    width: 50%;
    max-width: 800px;
    min-width: 480px;
    margin: 0 auto;
    padding: 0px;
    border: 2px solid #888;
    border-radius: 12px;
    background-color: #999;
}

li > strong, h2 > strong {
  font-family: 'ds-digitalnormal', monospace;
  font-size: 130%;
  letter-spacing: 0;
}

h1,h2 {
  text-align: center;
  background-color: black;
  color: lime;
  margin: 0px;
  padding: 10px;
  text-transform: uppercase;
  letter-spacing: 0.1em;
  text-shadow: 1px 1px 1px black,
               2px 2px 1px lime;
}

h1 {
  border-radius: 8px 8px 0 0;
  padding-top: 20px;
  background-image: url(../images/time-zone.png);
}

h2 {
  clear: both;
  text-align: center;
  padding-top: 15px;
}

ul {
  padding: 0;
  margin: 0;
}

ul:first-of-type li {
  float: left;
  width: 50%;
  text-align: center;
}

ul:first-of-type li a {
  display: block;
  text-decoration: none;
  font-size: 1.3em;
  letter-spacing: 0.1em;
  line-height: 2.5;
  background-image: rgba(0,0,0,0.25);
  border: 2px solid #888;
  background-image: linear-gradient(to bottom, #ccc,#999);
  box-shadow: inset 4px 4px 5px rgba(255,255,255,0.4),
              inset -4px -4px 5px rgba(0,0,0,0.4);
  color: #666;
  text-shadow: 1px 1px 1px black;

}

ul:first-of-type li a:first-of-type {
  border-left: 0;
}

ul:first-of-type li a:last-of-type {
  border-right: 0;
}

ul:first-of-type li a:hover {
  color: white;
}

ul:first-of-type li a:active {
  box-shadow: inset 4px 4px 5px rgba(0,0,0,0.8),
              inset -4px -4px 5px rgba(0,0,0,0.8);
}

ul:last-of-type {
    text-align: center;
    margin-top: 20px;
}

ul:last-of-type li {
    padding-bottom: 20px;
}

li {
  list-style-type: none;
}

h2 + div {
    padding: 20px 0 10px;
}

h2 + div select {
  display: block;
  width: 49%;
  margin: 0 auto;
  line-height: 1.3;
}

h2 + div + button {
  display: block;
  width: 50%;
  margin: 0 auto;
}

h2:nth-of-type(2) {
  margin-top: 20px;
}
Publishing your app
During development, Ember CLI continuously built our files and served them on our local server when we used the ember serve command. This build process was optimized for debugging and iterating on our application. However, we now want a build process optimized for production (e.g., file minification, fingerprinting, portable code). Fortunately, Ember CLI handles most of this for you. We just need to set some configuration options and run a build command specifically for a production environment.
In your project directory, navigate to the /config/environment.js file. At the bottom of this file, you’ll see an if block where you can set configuration options for the production environment. In this block, we want to set ENV.locationType to hash. This will ensure that Ember CLI appropriately handles the URLs for our application’s assets when we publish them. Update the bottom code block to the following:
if (environment === 'production') {
  ENV.locationType = 'hash';
}
Next, go to your terminal or command line, and run the following build command in the root of your app: ember build --environment=production. Assuming the application built successfully, you’ll see in the /dist directory that all of your files are minified and fingerprinted — optimized for production.
Uploading to Github
Just upload it on github pages.
References
- Modern web app architecture
- Mozilla Recommended Toolchain
- Core Concepts
- Naming Conventions
- Ember CLI
- Ember View
- Handlebars
- LocalForage
- Moment Timezone
- Brocfile.js
- Folder Layout
- redirect()
- transitionTo()
- Jack Franklin’s Scope and this in JavaScript
- Ember Data
- Models
- Specifying a route’s model
- Moment Timezone and _zones